Creating Pop-Pop Menus in Fireworks MX - v8
Step 1
Open your .png template in Fireworks MX or version 8 and 'show' all the slices by selecting 'layers > web layer'. All your slices will be highlighted in light green.
Open your .png template in Fireworks MX or version 8 and 'show' all the slices by selecting 'layers > web layer'. All your slices will be highlighted in light green.
Step 2
Select the navigation button you wish to add a drop-menu to. Lets say, we select the 'Products' button. This will now have a green border around the button.
Select the navigation button you wish to add a drop-menu to. Lets say, we select the 'Products' button. This will now have a green border around the button.
Step 3
From the top menu choose 'Modify> Pop-Up menu> Add Pop-up menu or right-click on the selected button and choose 'Add Pop-Up'. The Pop-up menu wizard will appear.

From the top menu choose 'Modify> Pop-Up menu> Add Pop-up menu or right-click on the selected button and choose 'Add Pop-Up'. The Pop-up menu wizard will appear.

Step 4
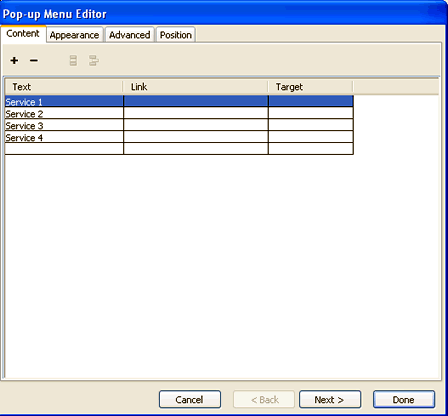
In the text field, enter the name of your first menu item.
In the example above, we have entered 'service 1'. You can also add the link of the text in the link field. Click the + button above to enter this first drop-menu item in your list.
In the text field, enter the name of your first menu item.
In the example above, we have entered 'service 1'. You can also add the link of the text in the link field. Click the + button above to enter this first drop-menu item in your list.
Step 5
Repeat the same steps for adding further menu items. We have added 3 more.
Repeat the same steps for adding further menu items. We have added 3 more.
Step 6
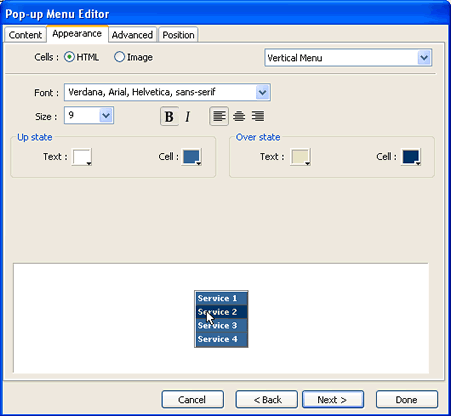
Click 'next' to continue. In the next Pop-Up screen, you can customize the appearance and colors of your drop-menu. By default the colors should already be generated if you have a pop-up menu elsewhere on the template. If not, you will have to define the 'upstate' and 'overstate' colors. Stick to the colors of the template.

Click 'next' to continue. In the next Pop-Up screen, you can customize the appearance and colors of your drop-menu. By default the colors should already be generated if you have a pop-up menu elsewhere on the template. If not, you will have to define the 'upstate' and 'overstate' colors. Stick to the colors of the template.

Step 7
Click 'Finish' to complete the wizard and create the menu for you.
If the drop-menus seem out of alignment beneath the navigation buttons, you can click on the menu to drag it until you feel that it is correctly aligned. This should be done with 'web layers' selected.
Click 'Finish' to complete the wizard and create the menu for you.
If the drop-menus seem out of alignment beneath the navigation buttons, you can click on the menu to drag it until you feel that it is correctly aligned. This should be done with 'web layers' selected.
Step 8
Preview the .png template in I.E. from Fireworks, by choosing 'file > preview in browser'.
Once you preview the menu in the browser (from Fireworks) in IE (click View > Source) ..... Notepad or Word for Windows will open, at the top of the html (about 4th line) you will see the function code: 'mmLoadMenus' that begins with:
<script language="JavaScript">
Copy the code from here to just before the head closing tag:
<script language="JavaScript1.2" src="mm_menu.js"></script>
And paste to replace the same code found in the Dreamweaver template. Don't export the entire layout, only preview the code in the browser and cut and paste the code to the Dreamweaver template.
Alternatively, try to figure out the following code that we have used for our example:
Navigation Top
Services >
Services 1
Services 2
Services 3
Services 4
Navigation Side
Products>
Product 1
Product 2
Product 3
Product 4
function mmLoadMenus() {
if (window.mm_menu_0226174832_0) return;
window.mm_menu_0226174832_0 = new Menu("root",60,15,"Verdana, Arial, Helvetica, sans-serif",9,"#ffffff","#e0e0c2","#336699","#003366", "left","middle",3,0,1000,-5,7,true,true,true,0,true,true);
mm_menu_0226174832_0.addMenuItem("Service 1");
mm_menu_0226174832_0.addMenuItem("Service 2");
mm_menu_0226174832_0.addMenuItem("Service 3");
mm_menu_0226174832_0.addMenuItem("Service 4");
mm_menu_0226174832_0.fontWeight="bold";
mm_menu_0226174832_0.hideOnMouseOut=true;
mm_menu_0226174832_0.menuBorder=1;
mm_menu_0226174832_0.menuLiteBgColor='#ffffff';
mm_menu_0226174832_0.menuBorderBgColor='#777777';
mm_menu_0226174832_0.bgColor='#555555';
window.mm_menu_0226174832_1 = new Menu("root",66,15,"Verdana, Arial, Helvetica, sans-serif",9,"#e0e0cf","#ffffff","#003366","#336699", "left","middle",3,0,1000,-5,7,true,true,true,0,true,true);
mm_menu_0226174832_1.addMenuItem("Product 1");
mm_menu_0226174832_1.addMenuItem("Product 2");
mm_menu_0226174832_1.addMenuItem("Product 3");
mm_menu_0226174832_1.addMenuItem("Product 4");
mm_menu_0226174832_1.fontWeight="bold";
mm_menu_0226174832_1.hideOnMouseOut=true;
mm_menu_0226174832_1.menuBorder=1;
mm_menu_0226174832_1.menuLiteBgColor='#ffffff';
mm_menu_0226174832_1.menuBorderBgColor='#777777';
mm_menu_0226174832_1.bgColor='#555555';
mm_menu_0226174832_1.writeMenus();
} // mmLoadMenus()
//-->
</script>
Step 9
The final part.
In the same Notepad code, scroll down until you come to the 'mouseover code' of the button with drop-menu you just created that begins with:
<a href="#" onMouseOut="MM_swapImgRestore();FW_startTimeout();" onMouseOver="MM_showMenu(window.mm_menu_0226174832_0,10,25,null,'services')
Note the variables '0,10,25' . The first variable '1' represents the menu, in this example it is the second menu (first one is always 0). The second variable '10' represents the distance to the drop-menu from the left-margin. '25' represents the distance to the drop-menu from the top-margin.
It is the second variable '10' or whatever it is for that particular button that you need to alter if the drop-menu is not aligned correctly in the .dwt template. Try increasing or decreasing this number to align the menu correctly, e.g. you can increase the variable to 12 or decrease to 8.
For the second menu under 'products' (we have used template 4 and the side navigation purpose in this example) the code would be:
onMouseOver="MM_showMenu(window.mm_menu_0226174832_1,125,4,null,'products')
Copy and paste to replace the existing mouseover code in the .dwt template in Dreamweaver. A good way to do this is to select the navigation button in the .dwt template and then switch to code view. You will see that the code for the navigation button is highlighted, replace the 'mouseover' code just before this.
In the .dwt template the final mouseover code for the navigation button would look like:
</a><a href="javascript:;" onMouseOut="MM_swapImgRestore();MM_startTimeout();" onMouseOver="MM_showMenu(window.mm_menu_0226174832_1,125,4,null,'products'); MM_swapImage('products','','../images/products_f2.gif',1)" ><img name="products" src="../images/products.gif" width="90" height="22" border="0"></a>
Remember, all you need to do is copy paste the code to the Dreamweaver template. Don't export the entire template. Find the same function in the Dreamweaver template and replace it with the above codes.
Ensure that your Javascript file named 'mm_menu.js' is located in the same path as your htm files. If you are creating menus from scratch and you do not have a Javascript file, then you will need to export the modified template as 'html and images' to a temporary folder, extract the Javascript file and place it in your main root site folder.
Important. Our Dreamweaver Templates were created using Fireworks version 4 and if you are using MX or Studio 8 version to create menus, then you will need to replace the fw_menu.js file with the newer version mm_menu.js. You can download the mm_menu.js file from here.


