


 Photoshop Templates
 Resources


Dreamweaver CS5 Templates Customization Tutorial
Previous versions MX 2004 and Studio 8 version click here. For Flash Demos click here.
- Unzipping the files
- Installing Fonts
- Customizing the header with your own company name or logo
- Customizing the navigation buttons
- Replacing the swap images
- Substitute the pictures in the template with your own pictures
- Dreamweaver CS5 Site Setup
- Deleting unwanted navigation buttons
- Editing the drop-down menus
- Customizing the footer with your company's copyright info
- Adding Content
- Changing fonts style - Using CSS Styles
- Change Colors
- Uploading your files and folders using a FTP client
Unzipping the files
Step 1
Unzip the zip file that you have downloaded using Winzip or any other unzipping software freely downloadable from the web.
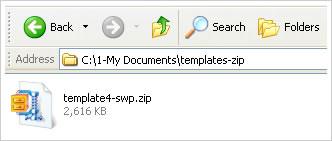
When you have unzipped the zip file these are the folders you will see:
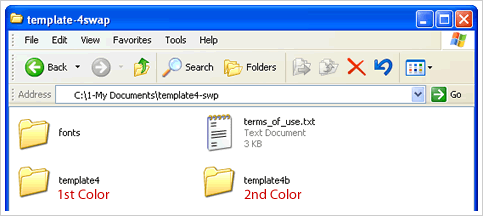
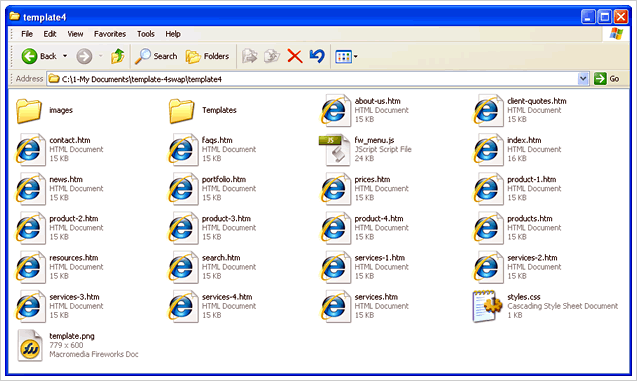
These are the files that you will see in the folder named 'template4' when you double-click on it in 'My Computer':
Installing Fonts on your machine
Step 1
From your Desktop menu, click on Start > Control Panel. Double-click on the fonts icon.
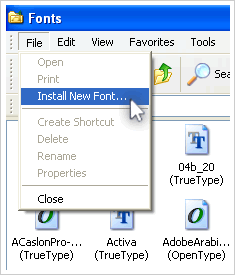
Step 2
In the 'Fonts' window that opens, select 'File > Install New Font.
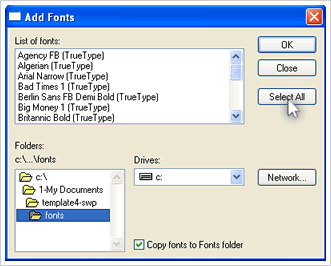
Step 3
The 'Add fonts' dialog box will open. Browse to the location of your fonts folder that you just unzipped and the fonts will appear.
click on 'Select All' and then click on o'kay to install them.
Customizing the header with your company name or logo in Adobe Fireworks CS5
Step 1
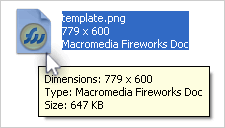
Open the file named 'template.png' in Adobe Fireworks
CS5 or by double-clicking on the file from 'My Computer'.
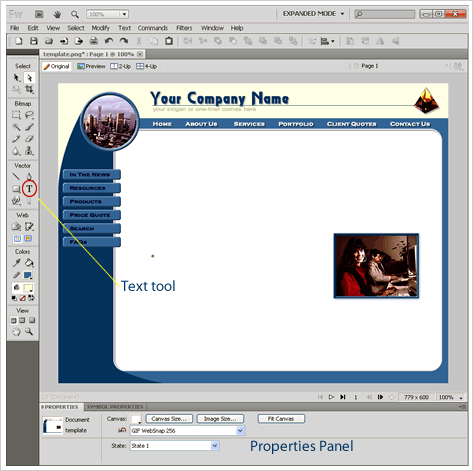
This is how your template.png file will appear as in Fireworks CS5:
Step 2
Double-Click on 'Your Company
Name' to edit the text label. (If the Company name is grouped, you
have to ungroup it to edit it. Right click on the company name and
click on 'Ungroup' from the drop-down) You can also click on the 'T' text tool
command in the 'tools' panel and place your cursor
over the text to edit it.

Step 3
Change the company name in the text editor. You can also adjust the font type, size and color in the 'Properties' panel (Window > Properties).
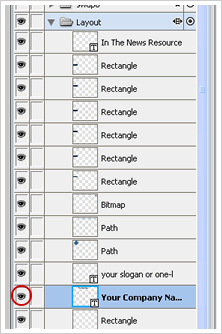
If you wish to replace the text name with your own logo then you can either delete the Text name by selecting it and then pressing 'DELETE' or hiding the layer for it in the layers panel (Window > Layers). In the layers panel collapse the layer named 'Layout' to reveal sublayers. Click on the 'Eye' icon to deselect the layer 'Your Company Name'. The site name is now hidden.
Step 4
To insert your own logo, select from main menu 'File > Import'. Browse to the location of your logo on your local files and click on 'Open'.
Next, place your cursor over the site name in the header and click with your mouse. The logo will now be inserted, Carefully position your logo in the same area as the existing site name.
TIP: When importing your own logo ensure that it has a transparent background so that it blends in well with the background color of the header.
Step 5
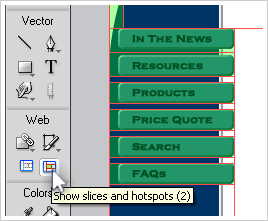
Once the Company Name and Slogan have been modified it is ready to be exported. From the 'Tools Panel', click on the 'Show slices & Hotspot's tool icon. When clicked on all your web slices will be highlighted in light green as shown below. The slices are areas that will be exported to your images folder. So, anything that you change inside the slice area will be updated in your template.
Step 6
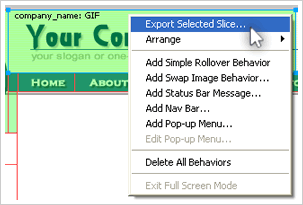
Select the 'Company Name' slice with your mouse, so that the guidelines around it will change to a blue color. Right-click with your mouse and select 'Export Selected Slice' from the drop-down.
Step 7
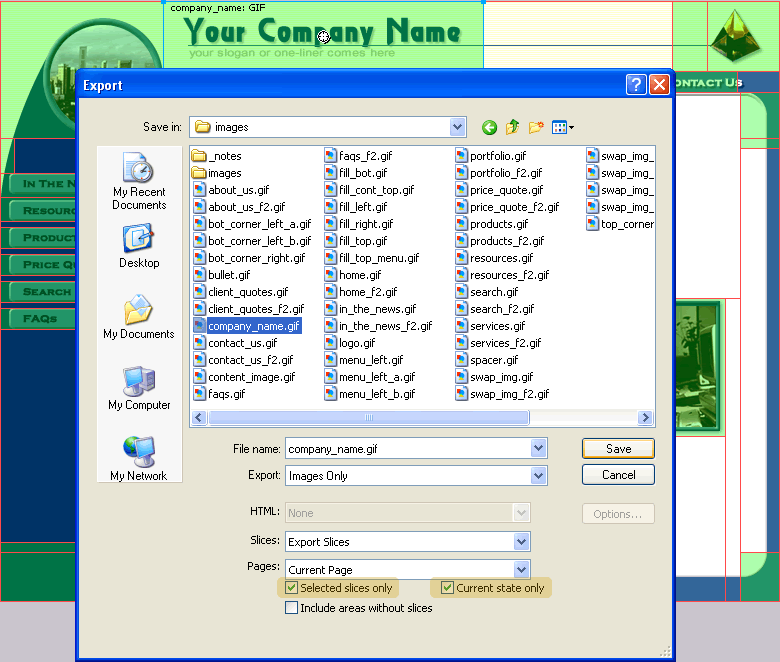
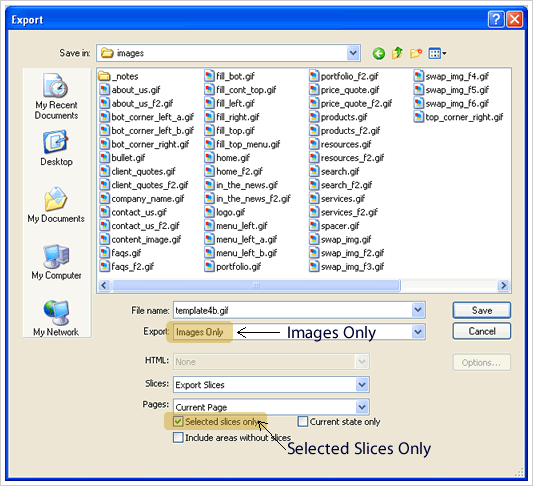
In the export dialog box that appears, browse to the location of your images folder (inside). Leave the file name 'as is' (company_name.gif.
Select the options in the 'Export' Dialog box as:
Export - Images only
Slices - Export Slices
Pages - Current Page
Check (tick) the following options:
Selected Slices Only
Current State Only
Customizing the Navigation buttons
Customizing the top and side navigation buttons use the same steps as customizing the Company site name, i.e. we use the text tool editor. This time we would need to edit the rollover or mouseover state for them.
Step 1
Open the template in Fireworks (.png file).
Note: In a few of the Dreamweaver templates the top navigation text links need to be modified in Dreamweaver (.dwt file) by replacing with your own text. The drop menus may be out of alignment. To align them correctly contact us for easy instructions.
Step 2
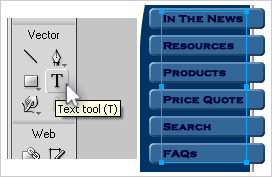
Double-Click on the text in the buttons to edit the labels. (If the links are grouped right-click on the links and click on 'Ungroup' to edit the links) You can also click on the 'T' text tool command in the 'tools' panel and place your cursor over the text to edit it.
Step 3
Once the button labels have been changed, we then need to change the button names for the rollovers/mouseovers to correspond. This is done in State 2 layer.
Step 4
From the main menu select 'Window > States.
In the 'States' Dialog box that appears select 'State 2' from the list.
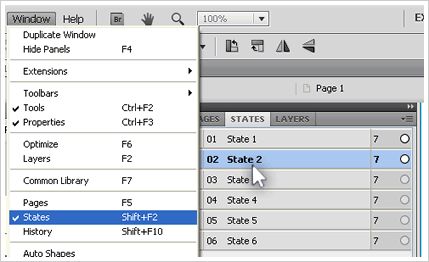
Your layout will now switch to 'State 2' and you can edit the button labels for Rollover/Mouseover State.
Step 5
Once all the button labels have been modified they are ready to be exported. We use the same steps as exporting the 'Company Name' slice.
From the 'Tools Panel', click on the 'Show slices & Hotspot's tool icon. The slices will be highlighted in light green.
Step 6
Select the first button slice with your mouse and then hold down the shift key and select the next slice, repeat with the shift key pressed until all the button slices have been selected.
Now, from the top menu select 'File > Export'.
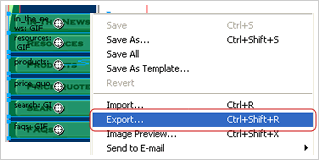
In the export dialog box that appears, browse to the location of your images folder (inside). Leave the file name 'as is'
Select the options in the 'Export' Dialog box as:
Export - Images only
Slices - Export Slices
Pages - Current Page
Check (tick) the following options:
Selected Slices Only
See Screenshot as below:
Cick on 'SAVE'. You will be prompted to overwrite the existing buttons slices with the same name. Click 'okay.
Once the images are exported they will automatically be reflected in the site.
Just for your information the rollover names end in 'f2_ services.gif will be services_f2.gif, products will be products_f2.gif etc.
Replacing the Swap Images (Selected templates)
Step 1 Open template.png in Adobe Fireworks CS5.
Step 2 If your template uses Swap Images you'll find that the png template in Adobe Fireworks CS5 is divided into different States. Each State will have a different swap representing each of the sections.
Step 3 To view all the swaps in
the Fireworks template open the States panel by clicking on Windows > States.
Click on each of the States to view different instances of the swaps.
Step 4 To change the first swap image, ensure that 'State 1' is selected in the 'States' panel.
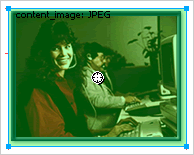
Now, from menu import you new image. Select from menu 'File > Import'. Browse to the location of your image and click on 'Open'. Place your cursor over the circle and click with your mouse.
Position your mouse carefully over the circle and 'cut it' (Edit > Cut). Now, select the circle area so that you see blue guidelines around it as seen in the screenshot below:

Now, from menu click on Edit > Paste Inside. This will paste the picture neatly within the circle thus giving the picture a circular look.
Step 5 Repeat these steps for each of the swaps in each of the States by clicking on the appropriate State i.e. State 2, State 3, State 4, State 5 and State 6 in the 'States Panel'.
Step 6 Once all the pictures are finalized and are looking fine in Fireworks, the next step is to export all the swaps - the names of the swaps will be as follows:
* swap_f2.jpg - for the swap in the second State (States 2)
* swap_f3.jpg - for the swap in the third State and so on ...
Step 7 From the 'Tools Panel', click on the 'Show slices & Hotspot's tool icon. The slices will be highlighted in light green.
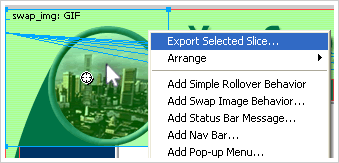
Select the swap image slice for State 1 and right-click on it. Select 'Export Selected Slice' from the drop-down.
Select the options in the 'Export' Dialog box as:
Export - Images only
Slices - Export Slices
Pages - Current Page
Check (tick) the following options:
Selected Slices Only
Current State Only
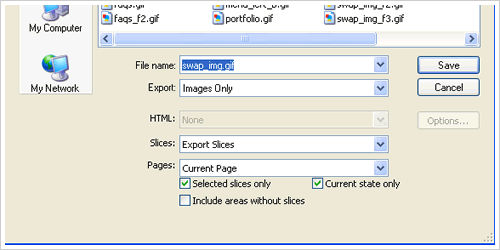
Browse to the location of your images folder and click 'Save'. When you get a prompt to overwrite the existing slice with the same name, click 'o'kay'.
For the remaining Swap images that correspond with the menu buttons, repeat the same 'Export Selected Slice' instructions.
Each time you select a Swap image to export ensure that the appropriate State in 'States Panel' is selected. Then export it to correspond with the same name i.e:
* swap_f2.jpg - for the swap in the second State (States 2)
* swap_f3.jpg - for the swap in the third State
* swap_f4.jpg - for the swap in the fourth State
* swap_f5.jpg - for the swap in the Fifth State
* swap_f6.jpg - for the swap in the Sixth State
The swaps can be selected from the list in the 'Export Dialog box'. Basically, you are overwriting them with the new ones.
Step 8 Once the pictures are exported preview the Dreamweaver template in I.E or FireFox to test if all the swaps are working fine.
Substitute the pictures in the template with your own pictures
Step 1 Open the file named template.png.
Step 2 Unlock all the layers (Window > Layers) so that you can select the pictures you want to change. If you see a lock icon next to a layer, click on it to 'unlock' it.
Step 3 Select the picture you want to change, delete it and replace it with your own pictures, by using the 'Import' command (File > Import). Make sure your own pictures are the same size as the existing images. You can use the marquee tool to crop your picture to get the same size.
If you are replacing the Home-page image with your own image, use the same 'Copy and Paste Inside' technique as described earlier in the 'Swap image replacement' instructions.
Import your new image, place it over the Body Image, cut it (Edit > Cut), select the Body Image with your mouse and finally 'Edit > Paste Inside'.
Step 4 Once you've changed all the pictures you need to export the pictures again so that they are refreshed in the Dreamweaver template. Follow these instructions to export the images:
* All the slices will show in green. Right-click on the changed slices and click on Export Selected Slices.
* Export the slices with the same names to the images folder.
Step 5 When you preview the template in I.E. or Firefox you should be able to see the new images.
Note: If you are replacing images in the header with your own, make sure they have a transparent background for best effects.
Here are a good source for quality images and photo stock:
www.bigstockphotos.com
www.fotosearch.com (Many quality stock photography vendors at one site!)
www.hemera.com (Great source of transparent images)
www.corbis.com
www.superstock.com
www.gettyimages.com
Do not take any FREE images off the net, you could be subject to copyright infringements.
dREAMWEAVER CS5 Site Setup
Step 1
Open Dreamweaver CS5 software.
Step 2
Set up a New Site by clicking on Site > New Site or clicking on the site setup icon near it at the top.
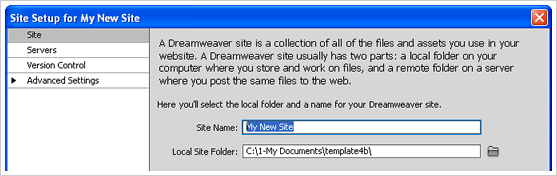
![]() Fill in your site details in the Site Setup Definition panel. Fill in
your site name and use the folder icon to browse to the folder where
your template files reside on your local computer.
Fill in your site details in the Site Setup Definition panel. Fill in
your site name and use the folder icon to browse to the folder where
your template files reside on your local computer.
Step 3
 Once you have setup your site. A site cache will be generated on the right-side panel of Dreamweaver CS5. All your site files will be synchronized.
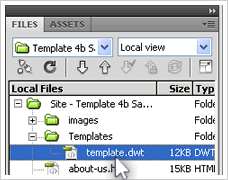
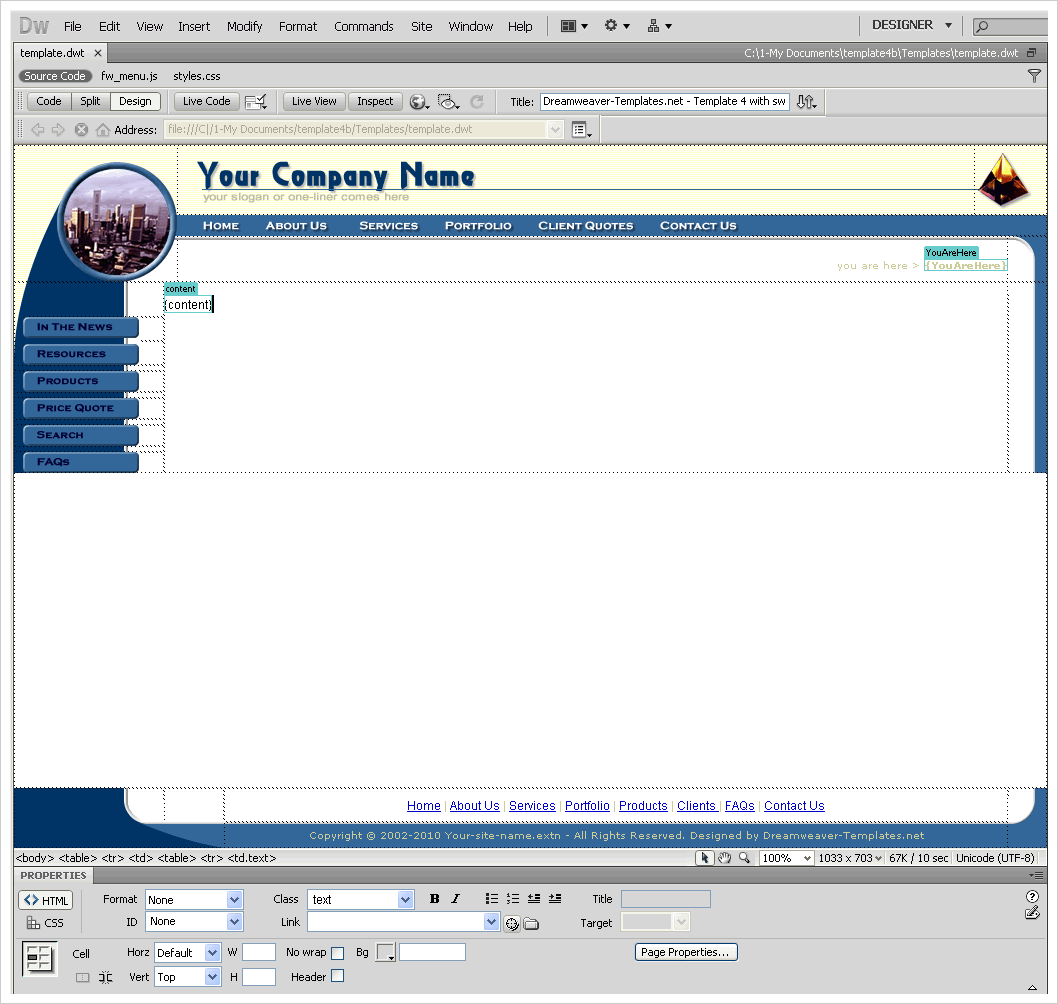
In the Site Cache panel double-click on the file named 'template.dwt'. This file is located inside the folder named 'Templates'.
This is how your template will appear in Dreamweaver. Click on image for large preview:
Modifications to the web site
Step 1
To make major modification to the website, such as addition, deletion of a button, adding or changing a link to a button, modify the template.dwt. When you save the template.dwt, you will get a prompt to update all your site files. Click 'UPDATE'.
In most cases you will only be changing the link names and copyright info at the footer.
IMPORTANT: Do not insert content in the body of the 'template.dwt' file. This is a defined editable region. Content is inserted in the editable region of the html files.
Step 2
Save your modifications, and choose 'Update' to propagate changes to all other pages in the website that use the template.
Deleting unwanted navigation buttons
Step 1 Open the template.dwt file in Dreamweaver (template.dwt).
Step 2 Select the button that you want to delete.
Step 3 Delete the image.
Step 4 Save changes and click on 'UPDATE pages' when prompted..
Editing the drop-down menus
To edit the drop-down menus you will need to modify the code in the Code Inspector window. (If you need to add further drop menus or change their positions contact us for easy instructions.)
Open the code inspector by clicking on Windows/Code Inspector. Scroll up to function fwLoadMenus(). The function will look like this:
if (window.fw_menu_0) return;
window.fw_menu_0 = new Menu("root",100,18,"Verdana, Arial, Helvetica, sans-serif",11,"#ffffff","#ffffff","#22438e","#3364BD");
fw_menu_0.addMenuItem("Services 1");
fw_menu_0.addMenuItem("Services 2");
fw_menu_0.addMenuItem("Services 3");
fw_menu_0.hideOnMouseOut=true;
window.fw_menu_1 = new Menu("root",100,18,"Verdana, Arial, Helvetica, sans-serif",11,"#ffffff","#ffffff","#22438e","#3364BD");
fw_menu_1.addMenuItem("Product 1");
fw_menu_1.addMenuItem("Product 2");
fw_menu_1.addMenuItem("Product 3");
fw_menu_1.hideOnMouseOut=true;
fw_menu_1.writeMenus();
} // fwLoadMenus()
fw_menu_0.addMenuItem("Services 1 ","location='/services1.htm'");
fw_menu_0.addMenuItem("Services 1","location='/services1.htm'");
fw_menu_0.addMenuItem("Services 2","location='/services2.htm'");
fw_menu_0.addMenuItem("Services 3","location='/services3.htm'");
fw_menu_0.addMenuItem("Services 4","location='/services4.htm'");
fw_menu_0.addMenuItem("Services 5","location='/services5.htm'");
If you want to delete a menu item select the line for that item and delete it. E.g. If you only wanted 2 menu items the code would be:
fw_menu_0.addMenuItem("Services 1","location='/services1.htm'");
fw_menu_0.addMenuItem("Services 2","location='/services2.htm'");
You can change the font, colors of the drop-menu labels and even the width of the cell to accomodate longer text by changing the menu variables:
("root",100,18,"Verdana, Arial, Helvetica, sans-serif",11,"#ffffff","#ffffff","#22438e","#3364BD")
'100' - represents the width of the menu cell. You can increase or decrease this if required.
'18' - represents the height of the menu cell.
"Verdana, Arial, Helvetica, sans-serif" - represents the font face.
11 - Indicates the size of the menu text.
"#ffffff","#ffffff","#22438e",#3364BD" - represents the colors of the normal state of the menu cell and the hover state.
Customizing the footer with your company's copyright info
Step 1 Open the template.dwt file from the 'Templates' folder in Dreamweaver.
Step 2 Select the Copyright text found at the bottom of the page and change it to your company's information.
Step 3 Save changes. You should get a prompt to update all you pages automatically.
Adding content
Step 1
The first step is to apply the template to all the content pages. Make a new page and apply the template by clicking on Modify/Templates/Apply Template to Page. Select 'template' from the list. The template will now be applied to the page.
Note: You can also use an existing html page to create a new one. Just replace the content and save it with another file name. Be sure that your navigation buttons in the template.dwt link to the new page. Open the the template.dwt file, select the button with your mouse and in the properties box change the link to point to the new page. Click 'save' to 'UPDATE' all your pages using the template.
Step 2
Once you apply the template to the html page you will notice that the template has only one editable region called 'content'. This is where you need to insert the content.
The table cell will automatically take the 'textfont' CSS Style. If you want to change the font you can do so in the external style sheet.
Step 3 Save changes.
Changing fonts style - Using CSS Styles
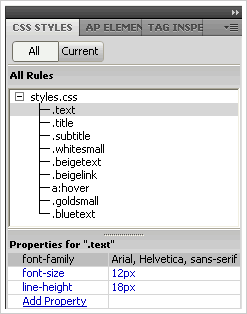
If you want to change a font type or size you can do it using CSS Styles. The changes will automatically be updated throughout the site. All the styles are stored in an external style sheet called 'styles.css' Following are the steps edit a style.
Step 1
From main menu select 'Window > CSS Styles'. The CSS Panel will appear on your right-hand side.
Step 2
Click on the style to edit it.
Step 3
Change the font type, font size and other attributes in the Style definition box.
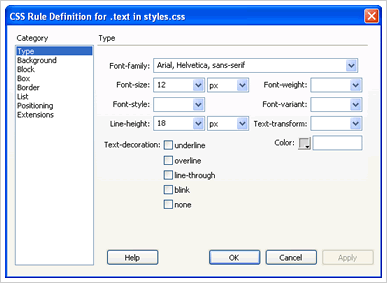
Step 4 Click on OK to save the changes. The changes are automatically reflected throughout the site.
Change Layout Colors
In Adobe Fireworks
CS5
Step 1
Open template.png
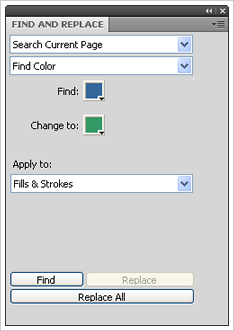
Step 2 Click on menu 'Edit > Find & Replace'.
Step 3 In the 'Find and Replace' panel choose 'Search Current Page' from the first drop-down menu and 'Find Color' from the next drop-down menu.
Step 4
Enter the find and replace colors from the color pallette or enter your own hex value to change the colors in the template.
Here's a screenshot of what it should look like:
Step 5 Once all the colors are changed in the template you need to export all the images again so that they are refreshed in the Dreamweaver template.
- From the 'Tools Panel', click on the 'Show slices & Hotspot's tool icon. The slices will be highlighted in light green.
- All the slices will show in green. Right click on the changed slices and click on 'Export Selected Slices.'
- Export the slices to the images folder.
- When you preview the template in a browser you should be able to see the new images.
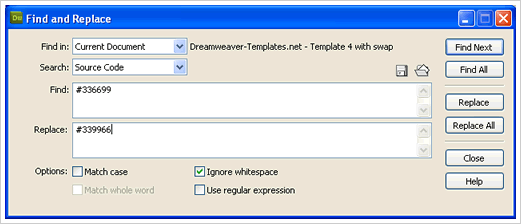
In Dreamweaver
CS5
Some colors may have to be changed in the html code also. In this case you have to open the Dreamweaver template and make changes to the template. Follow the instructions given below:
Step 1
Open the Dreamweaver template (template.dwt)
Step 2 Click on menu 'Edit > Find & Replace' to open the 'Find and Replace' Panel
Step 3 Choose Current Document from the Find In: drop-down
Step 4 Choose Source Code from the Search drop-down
Step 5 Enter the color you want to replace in the first text field 'Find' and the new color in the Replace field.
Step 6
Click on the Replace All button to replace all the instances of the color
Here's a screenshot of what it will look like:
Step 7
Once you've changed all the colors your template should look fine. Preview the template by clicking on File/Preview in Browser
A great tool that we recommend in choosing super color schemes is:
http://www.colorschemer.com
http://www.tigercolor.com
They have a free trial offer too.
Uploading files to you remote server using FTP software
We recommend using Filezilla to upload your files to your remoter server (Web hosting)
Step 1 Download Filezilla free from here. Setp a new site and then enter your FTP info in the appropriate fields such as :
FTP host name
Username
Password
Step 2 Click on 'Connect'
Step 3Your local files will be displayed on the left-hand side panel. Your remote server where your files will be uploaded will be displayed on the right-side panel.
Select a file or folder from your Dreamweaver site files and right-click with your mouse, select upload to server. Upload your files and folder to a directory named either 'public' or 'html' on your remote server.
